As promised in my previous post, here is the tembe I made. For those of you who don't know, and I didn't until last week, a tembe is a square African building used by nineteenth century Zanzibar slavers and such like.
 Apparently the name indicates its intrinsic squareness as opposed to the normal round huts
that everyone lived in during that period (and still do, in some places,
as I have seen for myself in Uganda).
Apparently the name indicates its intrinsic squareness as opposed to the normal round huts
that everyone lived in during that period (and still do, in some places,
as I have seen for myself in Uganda).
 Such buildings were used to keep the slaves in (and to stop other slavers stealing them) before shipping them off to wherever they were sold to.
 The inspiration for building this (in 15mm scale) was the recent article in Wargames Illustrated magazine (No. 356), where a 28mm building was showcased. The version featured was made of mdf and had a thatched roof.
 However, it struck me that a tembe could have a variety of uses in various periods and locations including ancient near east (as a villa), nineteenth century Mexico (a hacienda) and of course modern Africa, to complement my Peter Pig AK47 armies (as a police station, customs post, or similar).
From the African angle my reasoning was that the building may have been an old tembe that had had a new roof added, which is why I changed the roof to what could be interpreted as tiles (or corrugated iron) instead of thatch.
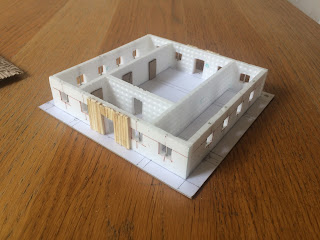 Construction was my usual pizza-base polystyrene 'foamboard' stuck to a cardboard base. The roof was made from corrugated cardboard; actually the cardboard insulating sleeves that you can pick up with take-away coffee.
 Around the doors I stuck on matches to represent a timber finish and bars were put on the windows. These were actually cut from some thick wire - the low 'E' string I'd removed from my electric guitar (a beautiful 'Artists' Series' Ibanez AR420-VLS) when I changed the strings recently.
For this model (the tembe, not the guitar) I made the roof removable. This was then undercoated in black and roughly painted with a rusty terracotta colour. All of the walls were painted in the chocolatey brown colour I normaly use and then coated in PVA glue and covered in fine sand. The floor of the courtyard and the surrounding ground were done in a coarser shelly sand I use for basing figures.
 The sanded walls were then painted off-white with smoother areas left the undercoat colour, as though the plaster had fallen off in places. Walls were dirtied up with various washes of dark earth. Interior rooms were painted black.
 The ground was painted a sand colour with some static grass (recently acquired from WWS) added. Overall, I was pleased how this turned out, as well as its potential versatility for various periods as mentioned earlier.


From the African angle my reasoning was that the building may have been an old tembe that had had a new roof added, which is why I changed the roof to what could be interpreted as tiles (or corrugated iron) instead of thatch.


 |
| Ibanez AR420-VLS |


